Search This Blog

Tuesday, June 5, 2012

Kickin' Chicken

So, yesterday I'm hanging out on Pinterest and a friend pins a chicken recipe that makes my mouth water. (Click here for the recipe that inspired me...I'm still gonna make it I swear!)...I was so hungry, and so excited so I ran to my kitchen certain that I had all the ingredients. Guess what? I didn't. So, I improvised. When I say that I improvised, I mean that my version shares cheese and BBQ sauce. Otherwise, it's nothing like it. I still need to drag my hiney to the store and get the ingredients to make the other chicken because it looks so yummy!

Here's what I ultimately came up with. I lovingly call it Kickin' Chicken, cause I'm tellin' y'all this stuff is for real kickin'!

Here's what ya need:

2 chicken breasts
BBQ seasoning ( I use KC Masterpiece)
Olive Oil
Sweet Baby Ray's BBQ Sauce ( Cause as far as I'm concerned this is the best!)
Shredded, or as I used, sliced colby jack cheese
1/2 medium vidalia onion
3 tbsp. Chopped fresh chives

Here's what ya do:

1. Heat 2-3 Tbsp. of olive oil in a frying pan. I used a medium heat setting. Preheat oven to 300 degrees.

2. Pound a couple of chicken breasts till they're quite a bit thinner than when you brought 'em home (or as        I would say "Beat the snot out of your chicken breasts").... Here's a before and after for ya:


Before
After ya beat the snot out of it.... hehehe


3. Season liberally with BBQ seasoning.

4. Place chicken breasts in the pan and cook slowly until no longer pink in the center.

5. Remove chicken breasts and place into a baking dish. Save your drippings in the frying pan and don't turn  off your heat just yet.

6. Saute sliced onions in the same pan your chicken cooked in until they are tender.

7. Top each chicken breast with 1 Tbsp. BBQ sauce, sliced cheese, and sauteed onions.

8. Finely chop fresh chives and sprinkle over top of chicken.
Yep...grew the chives myself!

9. Bake uncovered for 10 minutes or so until your cheese is all bubbly and melted.

10. Enjoy!!

Baked Sweet Potato and Side Salad makes the meal complete!


Venison BBQ

My husband is an avid hunter. But, he doesn't hunt for sport. He is adamant that you should only hunt if you use the meat to feed your family. I respect him for that. :)

Because of this, I have had to experiment with different ways to cook venison. It is really really good if you know what you're doing and you cook it right. As a matter of fact, the kids and I have grown to love it so much that they get super excited when hunting season rolls around and they know it's time for more tenderloin!

I did a little experimentation a couple of weeks ago, and the results were delicious!! If you like BBQ sandwiches, then you truly need to give the super easy recipe a try.


Here's what ya need:

1 deer tenderloin
1 bottle Sweet Baby Ray's BBQ sauce
1 envelope of Apple Cider mix
Water

Here's what ya do:

1. Place your deer loin in the crock-pot.


2. Mix cider according to package directions and pour over tenderloin.


3. Cook on high for 4 hours.


4. Pour 1/2 bottle or more if you like over the tenderloin and let it cook another hour.


5. Shred the tenderloin with a fork.


6. Serve on hamburger buns. (Add extra sauce to taste.)

Thursday, May 10, 2012

Peanut Butter Cookies: The Easiest Recipe EVER!

In my house, somebody always wants some sort of food that we don't have on hand. The Hubster is the world's worst about coming to me whining and begging for some sort of snack (usually a sweet one) that we don't have. Drives me NUTS...and sends me scrambling for something to shove in his mouth and quiet his inner sweets beast. The easiest and fastest thing I've found yet are these peanut butter cookies. These cookies will literally make your tongue slap your brain, but the best part?: ONLY THREE INGREDIENTS! 

Here's What ya Need:

1 large egg
1 cup of sugar
1 cup of peanut butter

...and yes, that's really it! 

Here's what ya do:

1. Dump 1 cup of sugar in a mixing bowl. I use my Pampered Chef Batter Bowl....Love, love love it!
2. Add 1 cup Peanut Butter.....Pick your favorite. I just buy the cheap stuff.
3. Add 1 large egg.
4. Mix it all up with a fork till it's smooth.
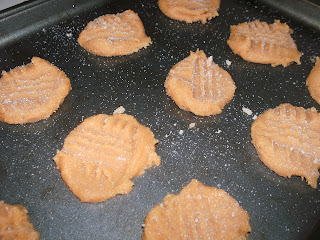
5. Drop by rounded teaspoons full onto a cookie sheet. Then dip a fork in sugar and make little criss-cross marks on top of your cookies. This will make 'em look like Grandma's :)
6. Bake for about 10 minutes in an oven that has been pre-heated to 350 degrees.

Enjoy!!!!


Wednesday, May 9, 2012

Strawberry Cobbler....A cup, A cup, A cup recipe

This is one of my favorite times of year. 
The sun's shining. The grass is growing. 
Trees are green, and the flowers are in bloom. 
But, best of all the strawberries are in!!!!


I love to go to the local strawberry farm, 
pick out my berries, come home, cap 'em, and slice 'em up.
I use 'em for lots of different stuff, but my favorite dish has to be.....
Strawberry Cobbler.


This recipe is the easiest one you'll ever try. I promise.


Here's what ya need:


1 pint of strawberries, sliced and sweetened to your liking
1 cup self-rising flour
1 cup milk
1 cup sugar
1 stick butter


Here's what ya do:


Preheat oven to 350 degrees.
Place a stick of butter in an 8X8 pan and melt it in the oven.
In a large bowl, whisk together flour, sugar, and milk.
When the butter's completely melted, remove the pan from the oven.
Pour the flour, sugar, milk mixture over the melted butter. DO NOT STIR!
Dump your berries over top. DO NOT STIR.
Pop it in the oven (UN-STIRRED) and bake until golden brown....about 20 min.
Unless you have my hot oven, then it's more like 10....hahaha
Serve it warm with vanilla ice cream, or Cool Whip. 


*** This recipe works great with just about any fruit. I really like to use canned peaches in mine. Just have fun and play around with it!! ****


Sunday, January 29, 2012

Simple Crescent Pinwheels

I love crescent rolls. I love snacks. I love cream cheese and I love bacon.....SO....I absolutely love, love, love these little munchies. They are so quick and easy and they make a great snack for parties, or football games. The flavor is amazing. Y'all are gonna wanna hug my neck for passing this recipe along.

Here's what ya need:

1 8 oz. pkg of cream cheese
1/2 cup mayonaisse
1/3 cup. canned chicken breast chunks
1 cup shredded cheddar cheese (you can also try colby jack, or if you want a little bite use some shredded pepper jack cheese)
6 slices of cooked bacon; crispy y'all
2 cans of crescent rolls

Here's what ya do:

Step 1: Mix up the cream cheese, mayo, chicken, cheese and crumbled bacon till smooth.

Step 2: Open crescent rolls and place them on a floured surface. Don's separate 'em. Just seal the perforations with your hand or better yet with a small pastry roller. You'll have 2 big rectangles of crescent rolls.

Step 3: Place half of mixture on one rectangle and half on the other.

Step 4: Roll them into logs.

Step 5: Slice up yer logs into 12 slices a piece.

Step 6: Bake at 400 degrees for 12-15 minutes.

Mmmmm....Mmmmmm...Good y'all.

Crock Pot Scalloped Potatoes

My hubster just loves taters, and scalloped potatoes are one of his favorites. I've found a great way to make these taters in the crock pot. Just put these babies on in the morning before work, and they'll be bubblin' up and waiting on you to dig in as soon as you walk through the door. They're easy as pie, y'all and so cheesy and good. Give 'em a try.

Here's what ya need:

2 lbs. small red potatoes
1 cup sour cream
1 tbsp. Worcestershire sauce
1 can condensed cream of potato soup
1 1/2 cups shredded cheddar cheese
23tbsp. cream cheese
1/2 tsp. paprika

Here's what ya do:

Step 1: Spray yer crock pot dish with cooking spray.

Step 2: Slice up yer taters good and thin.

Step 3: Mix up the sour cream, tater soup, and Worcestershire in a bowl.

Step 4: Add the taters to the bowl and toss 'em to get them all coated with the good stuff.

Step 5: Layer taters & shredded cheese till ya have about 3 layers. On each of the shredded cheese layers, drop in a tablespoon of cream cheese...It'll all cook in and come together.

Step 6: Pop yer lid on and cook those taters on low for 7-8 hours. Or if you're putterin' around the house that day, you can cook 'em on high for about 4 hrs.

Step 7: Stir 'em up and sprinkle some of yer paprika on top. Enjoy.

Thursday, January 26, 2012

Texas Steak Marinade

Nothing is better than the smell of a steak on the grill when the weather warms up. I absolutely love to see the smoke rollin' and hear the juices sizzlin' in the summer time; makes my mouth water just thinking about it. And, my Hubster makes the best dang steaks you ever flapped a gum on... Last summer he tried out a new marinade for our steaks. It's a little bit sweet, but still has a kick to it.

Here's what ya need:

1/2 c. Worcestershire sauce
1/2c. beer or water
1/2c. brown sugar
1 tbsp Texas Pete
1 tsp. lemon juice
1 tsp salt
1 tsp pepper
1 tsp garlic powder

Here's what ya do:

Step 1: Dump all yer ingredients in a big bowl

Step 2: Whisk 'em all together real good.

Step 3: Put yer steaks in ziploc bags and pour some of the marinade in. Let it sit in the fridge for a few hours...even better, leave it in all night.

Step 4: Freeze remaining marinade for later use.

**This makes a good batch of marinade, so if yer only grilling a couple of steaks freeze the leftovers and pull 'em out when it's time to grill again.

Better than Oreos Cookies

There's something I have to admit to y'all. I have a sweet tooth. I love sweets better than anything in this world and cookies are my weakness. If I make 'em I HAVE to have people around to help me eat 'em or I'll devour a whole batch by myself. One other thing I need to let y'all in on. I'm obsessed with cream cheese; cream cheese icing, cream cheese dips, cream cheese anything. So, you'll see why I absolutely LOVE these cookies. They're easy, cheap and so good- even better than Oreos.

Here's what ya need:

2 pkgs. Devil's Food Cake Mix (stock up when they're on sale)
4 eggs, beaten
2/3 c. veggie oil
8 oz. cream cheese (YES)
1/2 c. softened butter
4 cups powdered sugar
1/2 tsp. vanilla

Here's what ya do:

Step 1: mix up cake mixes, eggs & oil in a big ole bowl. It's gonna be thick, and that's exactly what ya want.

Step 2: Roll into 1 inch balls and put 'em on a cookie sheet.

Step 3: Bake 'em for about 8-10 minutes and them put 'em on a wire rack to cool.

Step 4: While the cookies are cooling, mix up cream cheese, and butter. Add in yer vanilla and powdered sugar. Mix it till it's smooth. Pop it in the fridge for a half hour.

Step 5: Spread cream cheese mixture onto one cookie and top with another. This makes between 2 and 3 dozen sandwich cookies, depending on how big you make 'em.

Step 6: Pour a big whoppin' glass of cold milk, kick back and enjoy.

How to stretch a pot of Pinto Beans

One of the cheapest things we make around here are pinto beans. The great thing about pintos is that you can do so many different things with them. I like to make one big pot, and then re-use the left-overs in different recipes for the next couple of days. Little tricks like this are great for helping to make your dollar stretch a little bit farther. Here's just one example of what you could do with the pinto beans.

Day 1:

Make that big ole pot of pintos. Please, for the love of peanuts, make sure that you put some good stuff in them and you're not eating bland pintos.  Season those puppies with a ham hock so that the flavor is just right.Now, yer gonna need some goodies to go along with those pintos, although my Hubster can make a meal on pintos alone....He puts mayonaisse in 'em, nastiest lookin' stuff you've ever seen, but that is another story. Moving on,.......... Make yerself a side of tater salad, some cabbage, and a pan of cornbread. Nobody will go to bed hungry tonight.

Day 2: Okay, so last night you had yourself a good old fashioned country meal. You had beans, taters and cornbread. Maybe tonight you can mix it up a little bit. Try putting those leftover pintos to good use and whip up a pinto bean casserole. They're super easy to make and don't take a lot of time or ingredients for that matter. If you had leftover tater salad, or cabbage it'll go along well with the casserole.

Day 3: So....Here's the deal. I'm paranoid about how long I'll use leftovers. I invoke the same three day rule my Mama always used. Around here if it ain't gone on the third day it's doggie chow. I just refuse to eat anything past that three day mark. So.....Now's the time to use up all those leftover pintos and what better way to do it than to make yerself some chili beans. These babies are super easy....I do 'em in the crockpot and it just doesn't get much easier than that does it? You're probably gonna wanna throw together another pan of cornbread to go with them.

See, how easy it is to make the most out of a simple pot of pintos? If you set yer mind to it, you  can stretch that dollar like a rubber band, and save some major dough!

Pinto Bean Casserole

There are a couple of dishes around here that are sure fire winners: casseroles and pintos. What better way to hit a home run in the kitchen than to combine the two? That's why everyone around here loves this pinto bean casserole. It's a great way to use up those leftover pintos from the night before.


Here's what ya need:

3 cups of pinto beans
1 lb. hamburger, browned and drained
1 medium onion, diced
1 can diced tomatoes ( or a pint jar of home-canned maters if you have 'em)
1 tbsp. Worcestershire sauce
2 tsp. chili powder
3 tsp. light brown sugar
1 box of Jiffy cornbread mix (mixed according to package directions)

Here's what ya do:

Step 1: Preheat yer oven to 350 degrees.

Step 2: Brown yer burger, and onion in a skillet till burger is cooked through and onions are soft.

Step 3: Mix hamburger, onion, maters, Worcestershire sauce, chili powder, light brown sugar and pintos in a large bowl.

Step 4: Pour into 9X13 casserole dish.

Step 5: Pour already mixed Jiffy Cornbread mix over top of bean mixture.

Step 6: Bake at 350 until the cornbread is golden brown (about 20 to 25 minutes)

Chili Beans

Chili Beans are a quick and easy comfort food. They're especially good during those cold months. As the temperature drops, there's nothing better than sitting around the fire enjoying a spicy hot bowl of chili beans. Now that'll warm ya up.


Here's what ya need:

4 cups of pintos
1 lb. of hamburger browned, and drained
2 -15 oz cans of diced tomatoes + 2 cans of water
2 heapin' tablespoons of chili powder....more or less depending on how spicy ya want it
1 large onion chopped
2 tbsp. brown sugar
2 tbsp. Worcestershire sauce

Here's what ya do:

Step 1: Brown yer burger and onion in oil. Drain & dump it in the crock pot.

Step 2: Add tomatoes, water, chili powder, brown sugar, and worcestershire sauce to the crock pot. 

Step 3: Give it a stir.

Step 4: Cook on high for 4 hrs. 

** Serve with shredded cheddar, sour cream, and tortilla chips.


Wednesday, January 25, 2012

Sweet 'tater casserole

I love sweet potatoes and I really really love sweet potato casserole. Last year, was making some for dinner and realized halfway into the process that I was out of milk. Of course, I initially panicked,but then I decided to get a little bit creative so I added some hazelnut coffee creamer that I did have onhand.....It was amazing and I've been making it that way ever since!

Here's what ya need:

3  c. mashed sweet taters
Either 1/2 c. hazelnut coffee creamer (liquid kind) or 1/4 c. milk & 1/4 c. creamer....
1 c. sugar
1/3 c. margarine
1/2 tsp. salt
2 eggs

For the topping: (my favorite part by the way)

1 c. brown sugar
1/3 cup flour
1 c. chopped pecans
1/8 c. oatmeal
1/2 stick margarine
1 tsp. pumpkin pie spice

Here's what ya do:

Step 1: Preheat yer' oven to about 350 degrees.

Step 2: Get out yer' mixer and mix up those first 6 ingredients real good.

Step 3: Pour it over into a 9X13 buttered casserole.

Step 4: Make yer topping. Melt the butter and then add in the sugar, flour,pumpkin pie spice,  oatmeal and pecans....It should be crumbly.

Step 5: Sprinkle crumbs on top.

Step 6: Bake that sucker for about 30 minutes

Step 7: Hide it so that you can have it all to yerself....You ain't gonna want to share this one.

Tuesday, January 24, 2012

Broccoli Casserole

Mmmmmm....Broccoli Casserole, cheesy, yummy, deliciousness. Oh how I love broccoli casserole. Problem is, not all broccoli casseroles are alike. Some are to die for, and some....well, they just make ya feel like dying. Uggh...There's nothing worse than getting all excited about broccoli casserole, taking that first bite, and wishin' you hadn't.

Never fear, this one's good. It's creamy. It's cheesy. It's, ummm...broccoli--y.

Here's what ya need:

2 pkgs. frozen chopped broccoli
1 pkg. boil in bag white rice
1 can cream of mushroom soup
1 can cream of cheddar soup
1 small vidalia onion
2+ cups of shredded cheddar cheese (the more the better as far as I'm concerned.)
Ritz Cracker Crumbs
Butter or margarine

Here's what ya do:

Step 1:

Preheat oven to 350 degrees

Step 2:

Cook your broccoli till it's tender.

Step 3:

Cook your rice.

Step 4:

Saute onion in about 2 tbsp. butter until tender

Step 5

Mix rice, soups, onions, broccoli, and 1- 1 1/2 c. cheddar cheese in large mixing bowl.

Step 6: Pour into buttered 9X13 casserole dish.

Step 7: Melt a couple tbsp. butter or margarine and add 1/2 c. ritz cracker crumbs. Mix well.

Step 8: Shredded Cheddar cheese over top of casserole.

Step 9: Top with buttered ritz cracker crumbs

Step 10: Bake at 350 degrees until bubbly:

Chicken Pie

I'm not sure how long I have been making chicken pie. I'm not sure where the recipe actually came from. I know that years and years ago, my first mother-in-law made it all the time....Hmmm..first mother-in-law...that sounds horrible. I've only had two of 'em yall. Anyway, This is cheap, easy, and so good you can't help but go back for seconds. Fix yourself some tater salad and green beans to go with it.

Here's what ya need:

Chicken, I use three leg quarters, or you could use chicken breasts if you prefer..I just happen to like dark meat.

a can of cream of chicken soup (again...DO NOT waste money of the name brand..unless it's on sale and ends up being cheaper)

2 c.. of the chicken broth reserved from boiling your chicken

1 stick butter or margarine

1 c. flour

1 c. buttermilk

Here's what ya do:

Step 1: 

Preheat yer' oven to 400 degrees.

Step 2: Boil yer' chicken in a pot till it's fallin' off the bones. Let it cool, then debone it and shred it up and throw it into a 9 X 13 casserole.

Step 3: 

Toss yer' cream of chicken and yer' broth into the casserole with the chicken. Use a fork to mix everything around real good and get most of your lumps out. Or you could mix the soup and broth in a separate bowl and then pour it over the chicken. I don't do that just because it's another dang dish to wash.

Step 4: 

Melt your margarine in a medium bowl. Add flour and mix it till it's good and smooth. 

Step 5: Add yer' buttermilk to the butter/flour mixture and stir it till it's smooth.

Step 6: Pour over top of the chicken mixture.

Step 7: Bake for around 30 minutes or so, or until the bread is nice and brown. 

ENJOY

Hash Brown Casserole


Okay y'all. So if you know me, then you'd know that there are a few things I love more than chicken, and here are a couple of 'em: cheese & taters. So, gimme some hashbrown casserole and I'm happier than a pig in slop. Here's my favorite recipe for it. Y'all are gonna love it.

Here's what ya need:

2 cans cream of potato soup
2 cans cream of cheddar soup
1pt. sour cream
1 bag frozen cubed hashbrowns
2 cups shredded cheddar cheese

Here's what ya do:

Step 1:

Preheat oven to 350 degrees

Step 2:

Mix all ingredients up in a big ole bowl

Step 3: 

Pour into a greased 9 X 13 casserole dish.

Step 4: Bake uncovered for 1- 1 1/2 hours. 

Gracious, this stuff is so good....

Orange Slushie

Photo by Nixxphotograpy
I love orange stuff...Orange popsicles, orange sherbert, orange....you get the picture. So, it shouldn't surprise y'all that I love these orange slush drinks. They are really refreshing in the summertime and simple to make.

What ya need:

frozen orange juice concentrate
1 pkg. vanilla pudding mix
1 cup of orange yogurt
a lil milk i'd say start with 1/4 c. and go from there. Just to get it to the consistency that you are looking for.

What ya do:

1. Get out your blender and plug it in.

2. put all the rest of yer ingredients in there.

3. Hit the button & blend it.

4. Drink it.

See. I told ya it was easy.

Meat Balls

Meatballs are one of my favorite dishes ever. A dear lady that I used to go to church with made these meat balls and they have always been the best you could put in your mouth. I adapted the recipe for use in the crock pot instead of on the stove top for all you busy Mamas like me out there .

Here's what ya need for the meat balls:

1 lb. ground beef
3/4 c. oatmeal
1 egg
1 medium onion chopped real fine. I like vidalia onions, but you can use a plain ole yeller one if that's all ya got.
salt and pepper to taste
vegetable oil for frying

Here's what ya need for the sauce:

1 (15 oz. can of tomato sauce)
3/4 cup water
1/4 c. apple cider vinegar
1/2 c. light brown sugar

Here's what ya do:

Step 1:

Take all the meatball ingredients and dump 'em in a big bowl. Mix it up with yer' hands. Make sure you mix it all up real good. Now, shape 'em into meat balls. 

Step 2:

 Heat vegetable oil in skillet on about med- med. High heat. 

Step 3: 

Brown the meat balls on all sides . Drain on paper towels.

Step 4:

Put those meat balls into yer' crock pot set on low heat. Dump in all your sauce ingredients and pop the lid on that puppy. Let it cook for 4 hours.

These are the absolute best meat balls ever. Enjoy.


Coconut Bon Bons

At Christmas time we like to make a whole whoppin' heap of the sweet stuff. Shoot, me, my Mama, and my sister cook up a storm around that time of year. I love sweets better than fried chicken, so there's no wonder it's my favorite time of the year. One of my favorite things to make are coconut bon bons. They're really simple...don't take a whole bunch of ingredients and this recipe makes a ton of 'em! You'll love these. I promise.

Here's what ya need:

3 8 oz. pkg of cream cheese(softened real good)....get the cheap kind y'all unless there's a really good sale of the name brands
3 tsp. vanilla
6 tsp coconut flavoring
4 lbs. powdered sugar
2 lbs. unsweetened coconut
1 1/2 tsp. salt

Here's what ya do:

Step 1:

Dump your cream cheese into a medium size bow. Add salt, vanilla, and coconut flavorings. Mix well.

Step 2:

In a separate bowl, and I mean a big one...think about it you've got 3 packs of cream cheese and 4 lbs of sugar to work with.. BIG BOWL...Okay, so in yer' BIG bowl, mix up yer' sugar and coconut...

Step 3:

Add yer' cream cheese mixture to the coconut & sugar mixture. Get your hands dirty and mix that stuff up. It takes a while to get it all worked together good, but it's worth it.

Step 4:

Roll into balls; maybe 1 inch or so...

Step 5:

Cover & place in the fridge for about an hour.

Step 6:

Dip the chilled balls in white chocolate......Mmmm Mmmmm Good. It'll make yer' tongue slap yo' brain!!!

Step 7:Place on waxed paper till chocolate is set.

Step 8:  Eat until you look like you're about 8 months preggo....park yer bootie and the couch and make the kids do the cleaning. Have fun.

Monday, January 23, 2012

Tuna Cakes

Okay, so most of y'all have had Salmon cakes before; especially if you live in the south. Salmon cakes, or as some folks say, Salmon patties are a southern delicacy.  I don't like cooking salmon cakes, just because I think that it stinks and I hate picking out the stuff. So.....I make my little version with tuna. I love tuna. I could eat it every single day, and my Tuna Cakes are a family favorite. They're cheap and easy. They don't take long to make, and they're really yummy! The dill sauce I make for these things goes so well with them. They taste really good if you fix 'em along with pasta salad and green peas!


Here's what ya need;

3 cans of tuna in water; drained
3 tbs. mayo (you can use the light if you're worried about calories, but I like regular)
1/2 c. ritz cracker crumbs ( I just crush 'em in my mini food processor)& I never use the name brand stuff unless it's on sale...the generic works just fine
1/4 tsp. dill seasoning
salt & pepper to taste
olive oil

Here's what ya do:
Step 1: heat a couple tbs of olive oil in a skillet, I usually heat it on med. high heat
Step 2: Empty yer' tuna into a medium bowl
Step 3: dump in yer' mayo, cracker crumbs, dill, salt & pepper
Step 4:shape into patties and fry them in yer' skillet until they're golden brown
Step 5: take 'em out of yer' pan and place 'em on a plate with some paper towels to absorb some of that extra oil.

**The measurements of mayo & cracker crumbs are approximations. For whatever reason, I usually end up playing around a little adding this and that till I get things to a good consistency. You want the tuna to hold together and not be crumbly. If it's a little too crumbly, just add some more crumbs till you get it like ya want it.

The sauce:

Ingredients:
 8 oz. sour cream
2 tbsp. dill seasoning

Mix them together till smooth. Serve over warm tuna patties. This stuff is so good y'all!


** Variations:

Sometimes I'll put a little sweet pickle relish in my patties. It changes it up a little bit and it's really good. You'll like this if you use it in your tuna salad.

If you're out of ritz crackers you can replace it with saltine cracker crumbs, bread crumbs, or seasoned bread crumbs...whatever you have on hand.


Sunday, January 22, 2012

Potato Soup

Around here, Po' Folks are known for having a couple of staples in their pantrys: Beans & Taters....If ya got ya some beans and taters around you won't be going hungry any time soon. But, I get a little bored with the everyday beans and taters; even though there are probably about a million different ways to make those taters. When I really wanna feel like I'm living high on the hog, I chunk up some of those taters and whip up some good ole tater soup.It leaves my family feeling like royalty every time. I did my shopping at the local Aldi and got some good deals on my groceries this week. I calculated how much money I had in the ingredients and broke it down to price per serving....Here's the lowdown on the cost:

Taters: I bought a 10 lb. bag for $3.29 used half...so cost was $1.65
Onions and Garlic: .40
Cream Cheese: $1.19
Chicken Broth: 2 @ $1.20 each= $2.40
Cheese: $1
Bacon: about a dollar's worth
Grand total: $7.75
12 servings....so...drum roll please...............................................................................................
Total cost per serving: $0.64
Not so shabby, huh? Plus, if you had your own stock you would have saved an extra $2.40. You just can't beat that with a stick.

 Here's what ya need to do it.

Ingredients:

 2- 32 oz. containers of chicken broth, better yet, If you've cooked some chicken lately and have some stock on hand, use that...it'll really save you some mulah

1 medium onion diced

about 5 lbs of taters....wash 'em real good and cut 'em into chunks...1/2 inch or so. I like the skins, plus I'm lazy and leaving them on really saves me some time.  If ya don't want the peels in there, just peel those babies and keep a truckin'...

garlic if you like it and I LOVE it: I use about 6 or 8 cloves diced up really really good, or you could use minced if you prefer

seasoning salt of your choice: I use the cheapo 50 cent kind from Wally World and it's good....try 1- 1 1/2 tbs.

Pepper....We love pepper so we use a lot...just season it to your own taste. You know those taste buds better than I do....

Cream cheese: an 8 oz pkg.

Cheddar cheese: shredded for garnishin' ...If ya don't have it don't sweat it...but I love cheese!

Crumbled Bacon: fry up an extra couple of pieces the morning ya make the soup and save 'em for evening.


Step 1: 

Throw the taters, onion, stock, garlic and your seasonings into a big ole pot. Give 'er a stir....Cook those bad boys on medium high heat for an hour and a half or so....just keep a check on the taters. When they're good and soft start kinda smooshing them with your spoon. I like to take a couple of cups out and put 'em in my blender to kinda puree them a lil' bit and then add them back in. You don't want it all pureed cause you wanna have some of those good chunky pieces left in there, but this step just adds to the creamy texture.

Step 2: Cut your heat back a little bit to around medium and add your cream cheese. Let it melt till it combines with the soup...Stir it every little chance ya get.

Step 3: Spoon it into bowls and garnish....Nothin' to this!

Step 4: Hold yer Hubby back...That man's gonna RUN back for seconds; maybe even thirds if he's a real big boy....Enjoy!